Home Networking Hardware Update
As 10G and Multi-Gig capable hardware becomes more affordable, I discuss how I am transitioning my home network to these newer and faster technologies.
As 10G and Multi-Gig capable hardware becomes more affordable, it made sense to do some upgrades to my home networking in order to transition to these newer and faster technologies. Many routers, switches, and Wi-Fi devices these days are supporting the IEEE 802.3bz standard. This standard allows for increased networking speeds of up to 2.5Gbps or 5Gbps over a typical 1Gbps connection. All while utilizing standard Cat5e cabling found in many residencies and offices. In this post, I'll go over some of the hardware changes since my last post, Virtualize pfSense for Google Fiber - A Dream Networking Stack, to the core networking for my home in order to support these advanced technologies. As well as some configuration changes to make the networks secure and reliable.
Hardware Details
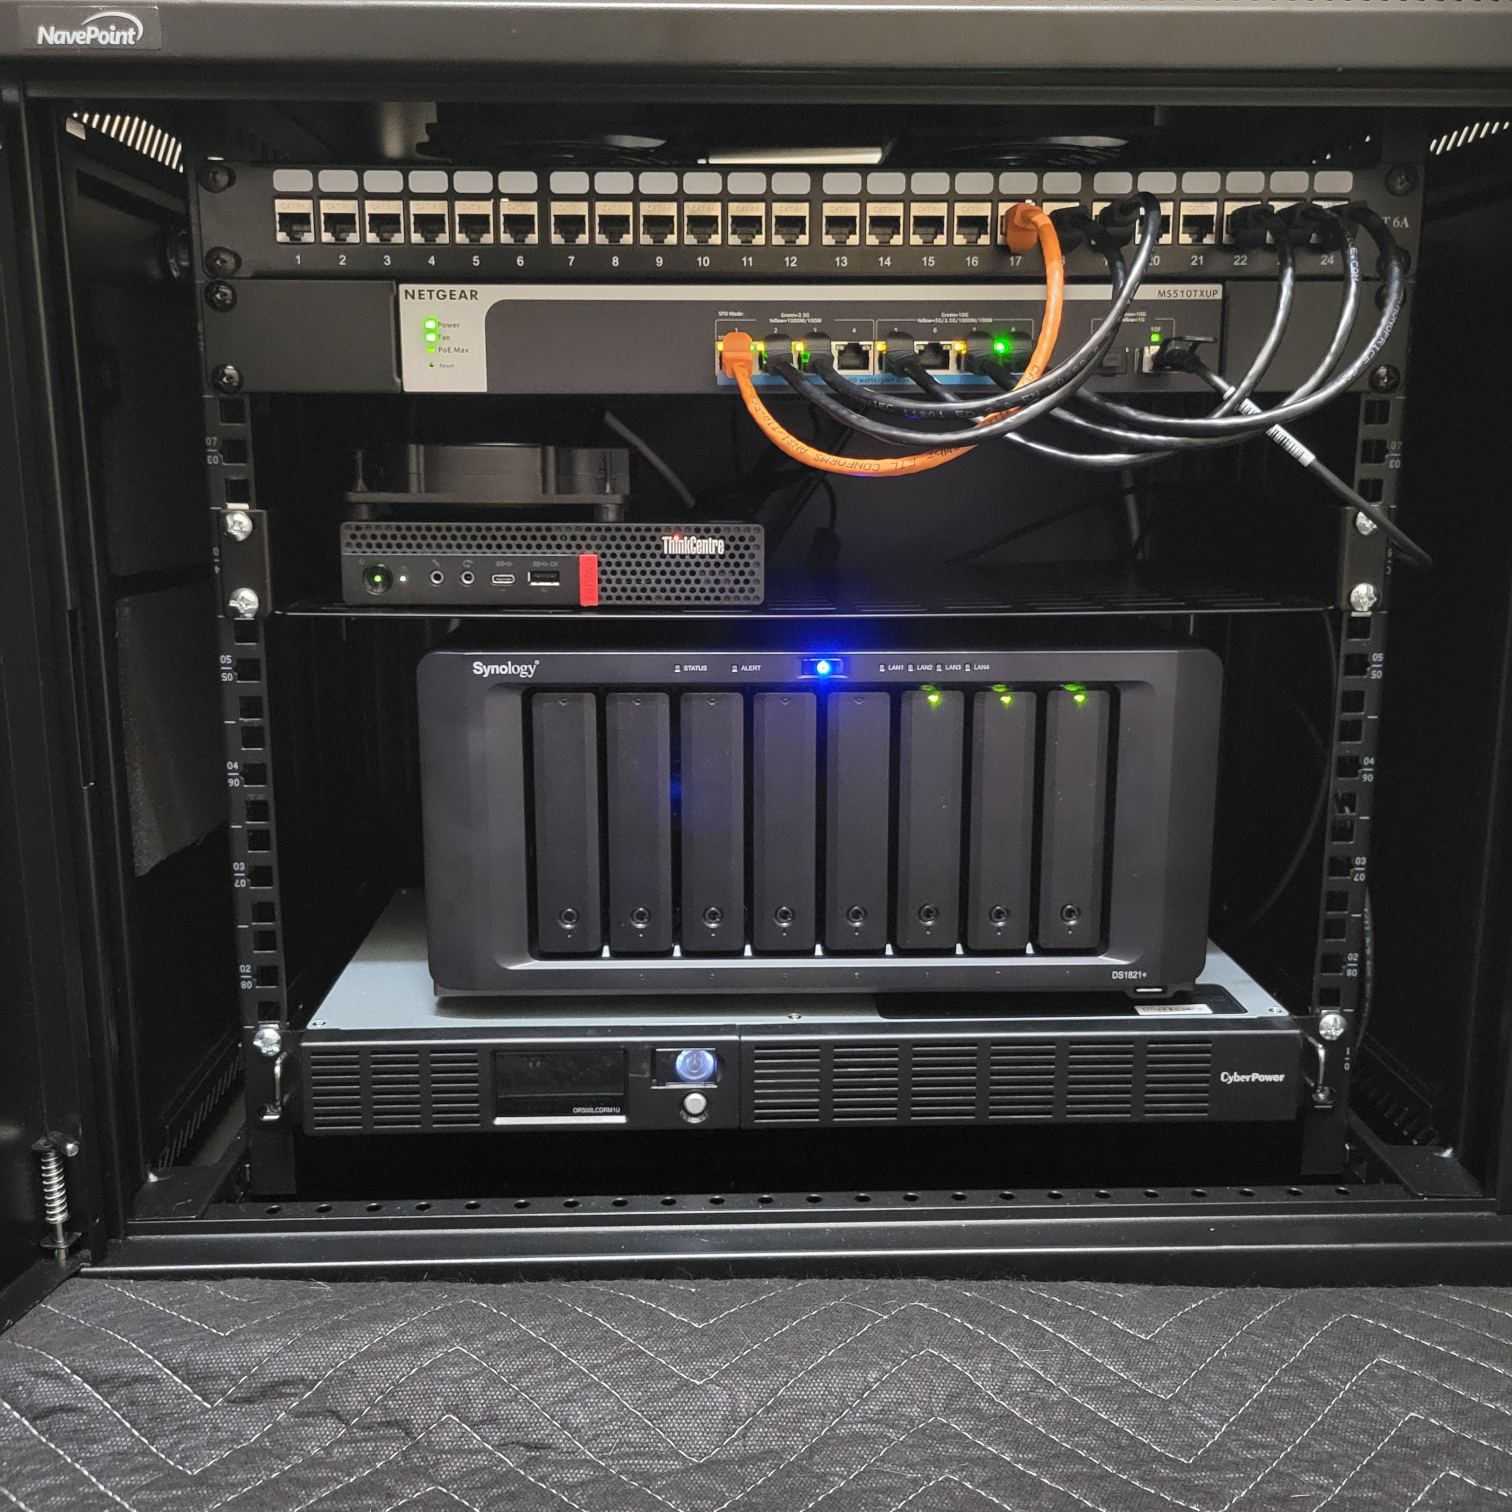
All of my networking equipment sits in a closet on my ground floor encased in a NavePoint 9U network rack enclosure. From top to bottom, we have the following:
- Patch Panel 24 Port Cat6A with Inline Keystone
- Netgear 10-Port 10G / Multi-Gigabit (MS510TXUP)
- Lenovo ThinkCentre M920x Tiny
- Synology DS1821+ 8 Bay NAS
- CyberPower OR500LCDRM1U 500VA/300W UPS
The AC powered fans that came with the NavePoint enclosure were too loud for my liking, so I opted to purchase and replace with AC Infinity S7-P Dual 120mm fans. The speed on these fans can be adjusted using a controller.
Lenovo ThinkCentre M920x Tiny
I upgraded from a Qotom Q355G4 to a Lenovo M920x Tiny for use as my pfSense router and firewall appliance. This little 1L PC is capable of some serious computing. It was manufactured from Lenovo with a 6 core Intel i7-8700 processor and a 128GB NVMe SSD. I opted for the lowest RAM possible and swapped that with 32GB of my own. The unit can handle two NVMe solid state drives, so I installed another for more space and for some redundancy in the form of periodic backups.

The specs of this tiny PC are quite impressive and include the following:
- Intel Core i7-8700 vPro (6 core / 12 thread, 3.20GHz up to 4.60GHz with Turbo Boost)
- 32GB DDR4 2666MHz (SO-DIMM)
- SK hynix Gold P31 1TB PCIe NVMe SSD
- 128GB NVMe SSD
- SuperMicro AOC-STGN-I2S Dual Port 10GB SFP+ NIC
Upgrading to 10G Routing
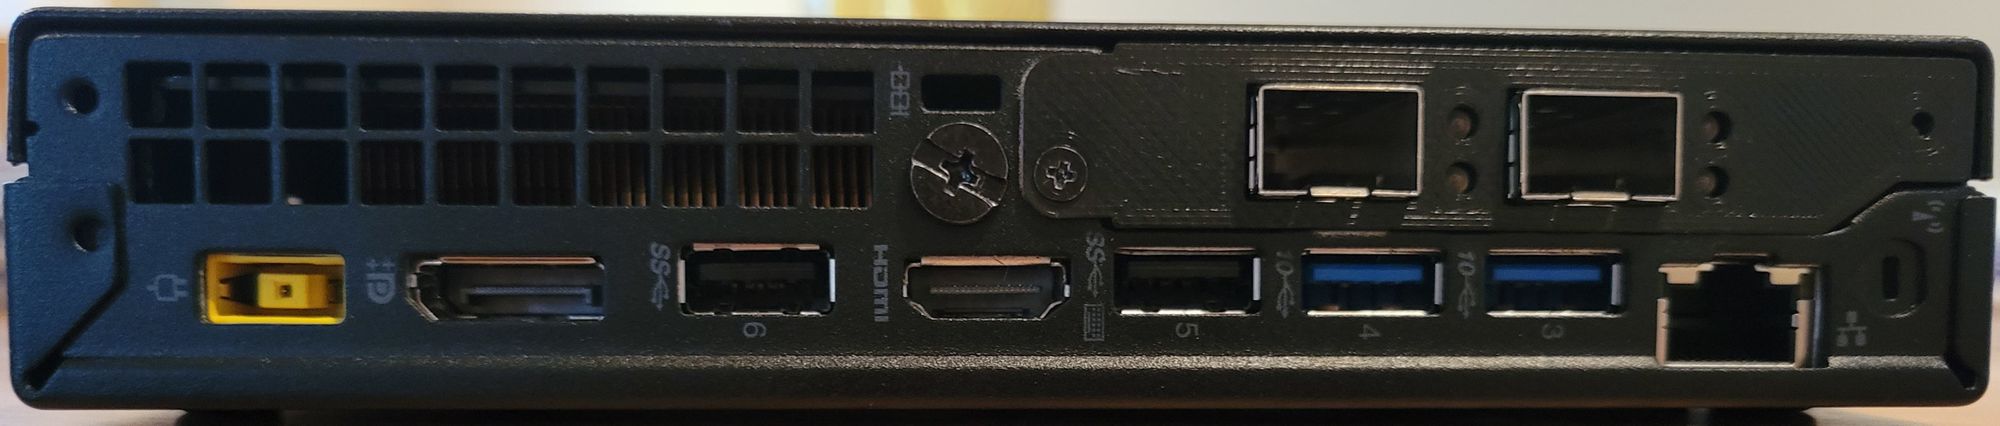
I originally configured my Lenovo M920x Tiny with an Intel i340-t4 and had been using this with a similar configuration as my Qotom unit. I found that transitioning this unit to 10G was quite easy and cost effective. And many of the parts can be found on Ebay for cheap. To do this upgrade, I did the following:
- Swapped to the 01AJ940 PCI-E x16 riser card (originally only a x4 riser card was installed).
- Installed the SuperMicro AOC-STGN-I2S NIC
- Purchased a 3D printed bracket from a fellow Redditor.

The 3D printed bracket is not a required item. But the PCI bracket used has to be specific for these Lenovo Tiny devices. Not just any generic low-profile bracket will work with the case. You may remove the bracket all together. That said, it makes the network card much more stable in the case. Preventing it from moving when inserting and removing transceivers from the SFP+ ports.
My hypervisor (Proxmox) is installed on the 1TB NVMe drive. The other drive is used to store periodic backups of the running VMs.
Netgear MS510TXUP

For my root router, I converted from a Ubiquiti UniFi Switch 8-Port 150W (US-8-150W) to a Netgear 10-Port 10G / Multi-Gigabit (MS510TXUP) switch. This is a pretty interesting switch as it offers four 1G/2.5G/5G/10G Ethernet ports, another four 1G/2.5G Ethernet ports, as well as two SFP+ 1G/10G ports. This allows transitioning the network as my hardware on the network supports these newer higher speeds.
In addition, all 8 Ethernet ports have Power Over Ethernet capabilities utilizing IEEE 802.3bt (Type 3) POE++. Each port can provide a maximum power output of 60W. With the switch capable of providing up to 295W of power in total!
This Netgear switch can either be configured using a management UI served through the device. Or through a cloud interface similar to the Unifi controller. Unlike the Unifi product line, the cloud service provided by Netgear, Netgear Insight, is a paid service. But it does seem priced reasonable well for home users at $9.99 / year, or $22 / year for the Pro service. I decided to forgo the payments and manage through the device.
Network Details
Generally, a conventional router will have a WAN and one or more LAN ports. My setup is a bit different in that both WAN and LAN traffic are transmitted through the same network port. In order to achieve isolation, I use VLANs to segment the traffic through the root switch.
Here is a table matrix of the physical ports on the root switch.
| Port | Description | Physical Status | Link Status | Frame Size |
|---|---|---|---|---|
| mg1 | Google Fiber | 1000 Mbps Full Duplex | Link Up | 1522 |
| mg2 | 2ndFloorSpareBedroom | 1000 Mbps Full Duplex | Link Up | 1522 |
| mg3 | 1stFloorFamilyRoom | 1000 Mbps Full Duplex | Link Up | 1522 |
| mg4 | Link Down | 1522 | ||
| xmg5 | 3rdFloorLab | 1000 Mbps Full Duplex | Link Up | 1522 |
| xmg6 | Link Down | 1522 | ||
| xmg7 | Office | 2.5 Gbps Full Duplex | Link Up | 1522 |
| xmg8 | NAS | 10 Gbps Full Duplex | Link Up | 1522 |
| xg9 | Link Down | 1522 | ||
| xg10 | pfSense | 10 Gbps Full Duplex | Link Up | 1522 |
The first port is used for egress and ingress traffic through my ISP, Google Fiber. Ports 2-8 are used for local traffic. Finally, we have the SFP+ ports, 9-10. Which are dedicated to routing. Currently, I only connect one 10G port to my router, which is plenty for my routing needs. In the future, I could connect another SFP+ cable and configure link aggregation for a theoretical speed of up to 20G.
I'm still in the process of upgrading the cables in my home. I hope to have multi-gig or 10G available to my lab in the near future. When WiFi 6E becomes reasonably priced, I plan on upgrading my two access points, on ports mg2 and mg3, and will have plenty of bandwidth capacity and power for those.

Here is a breakdown of the status of POE from the switch management UI. The first port, mg1, powers the Google fiber jack. The following two ports power my Unifi Access points. One great feature of this Netgear switch is that you can power cycle the POE from the UI. So if an access point is acting up, you can easily cut power to it and have it restart from your browser. In addition, you can monitor power consumption of the POE devices.
VLANs and Subnets
I use VLANs and subnets to isolate and control cross traffic for all of my networks. The benefit of this is that I can configure which devices can communicate with one another through firewall rules. As well as specify which interfaces traffic is able to propagate through.

For firewall rules, I completely isolate the guest WiFi from the rest of the other networks. In addition, I have some rules which establish trust boundaries on what devices are able connect to my management network. The management network consists of all the BMCs and OOB management devices and accesses to those remote services. This includes the management IPs for the Unifi access points, managements UIs for switches, iDRACs, and IMMs. Finally, the IOT network, which includes a secured home surveillance system, has a set of whitelisted IPs that can access the devices. These devices cannot reach out to the internet themselves.
A pfSense package I use to supplement security rules is pfBlockerNG. Which allows you to set country specific GeoIP block lists. I decided to select every country which the United States has current sanctions with and block them on all interfaces.
Google Fiber IPv6
Google Fiber will give out a /56 prefixed block of IPv6 IPs for delegation. I found this to be a little tricky to setup. The settings in pfSense can be finicky and require some playing around with. And I have experienced many instances where restarting my router has caused me to lose my IPv6 reservation. The only way I have found to get a new reservation is to power cycle the Google fiber jack itself.
That being said, when I do have an IPv6 reservation, I subdivide that /56 prefix into separate /64 prefixed networks. This allows for up to 256 different /64 prefix networks. Which is just an astonishing amount of contiguous IPs coming from IPv4!
Here is what my WAN DHCP6 setting look like.
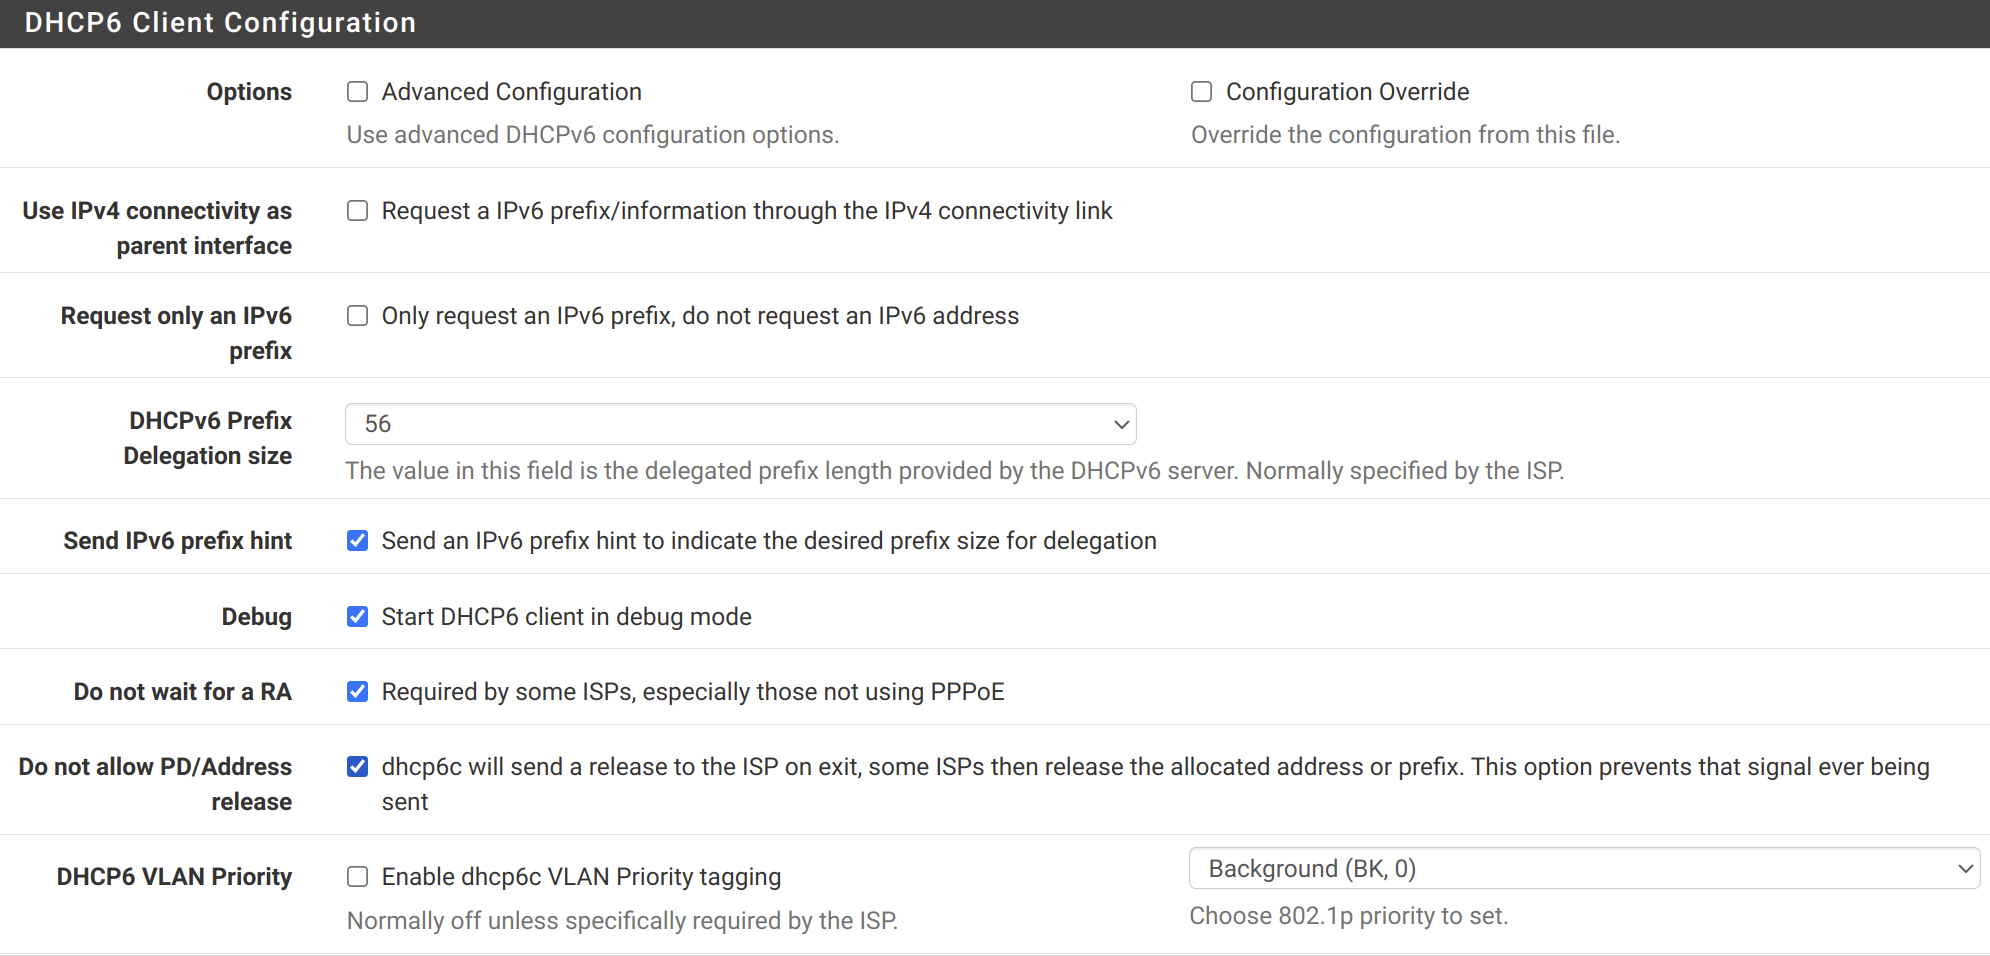
Then for each internal network interface, set IPv6 Configuration Type to Track Interface. Under the Track IPv6 Interface section, select WAN as the interface to track. And set a unique Prefix ID for each interface. Finally go to Services > DHCPv6 Server & RA, under Router Advertisements for each interface, make sure Router Mode is set to Assisted.
One thing to be aware of when using IPv6 is to make sure your firewall rules are taking the IPv6 protocol into account. Since you no longer have NAT to block direct access to local hosts, this becomes very important.
Hypervisor Configuration
Instead of running pfSense directly on my Lenovo M920x Tiny, I opted to virtualize it using Proxmox as a hypervisor. The configuration is very similar to what I had prior in my last post. But with a few important modifications.
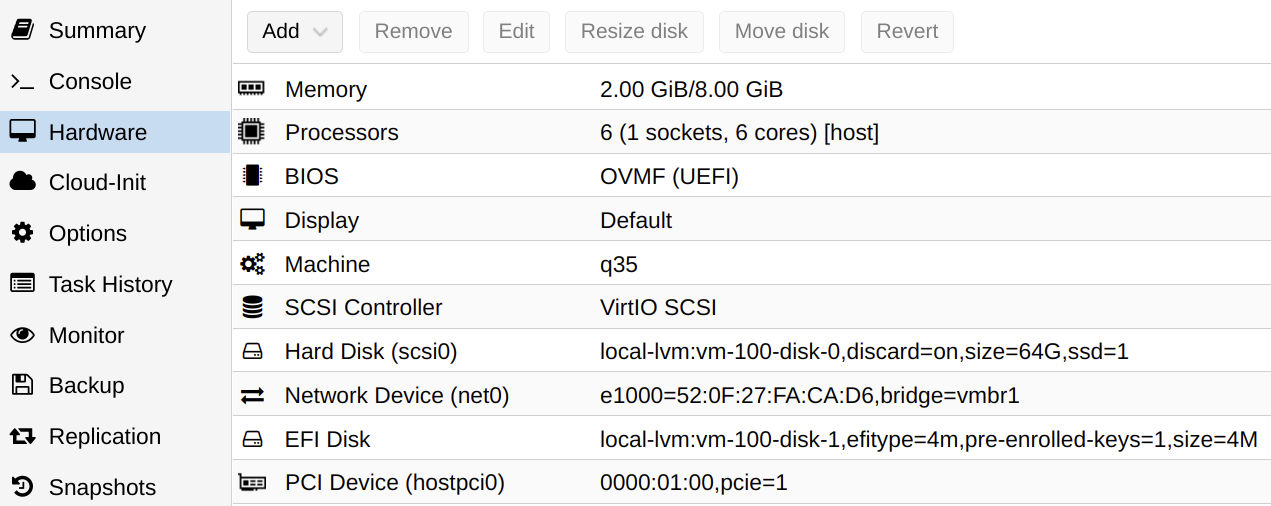
The first change I made is instead of virtualizing the network ports, I am now passing the PCI-E device directly through to pfSense. This allows a bit better performance as well as the ability to enable hardware checksum offloading. Since I am also using another virtual network in Proxmox to connect other VMs running along side pfSense, the virtual port on the pfSense VM to that Linux bridge must be of type Intel E1000 and not VirtIO. I have found that hardware checksum offloading does not work well with the later.

Here we can see the Linux bridge, vmbr1. This is used as a virtual network switch for other VMs on the hypervisor to communicate on. For example, my virtual machine for running Unifi Controller and Pi-Hole software, are connected through this virtual bridge.
The Lenovo M920x Tiny has an integrated Ethernet port, labelled eno1 here. This is used for management access to the hypervisor. If I ever am unable to reach pfSense or Proxmox through the root switch, I am able to connect a cable directly to this port. Then I have access to the Proxmox UI, where I have a Kali Linux VM available to start to use for troubleshooting.
Finally, instead of running LXC containers through Proxmox, I am running all services within virtual machines. I used to have privileged LXC containers running Docker engine and Pi-Hole and Unifi Controller Docker nested containers. But had issues upgrading Proxmox as it is not technically not a supported configuration through the hypervisor. I have found that VMs are a bit easier to self-contain and transfer, if need be, anyway.
Routing and Security
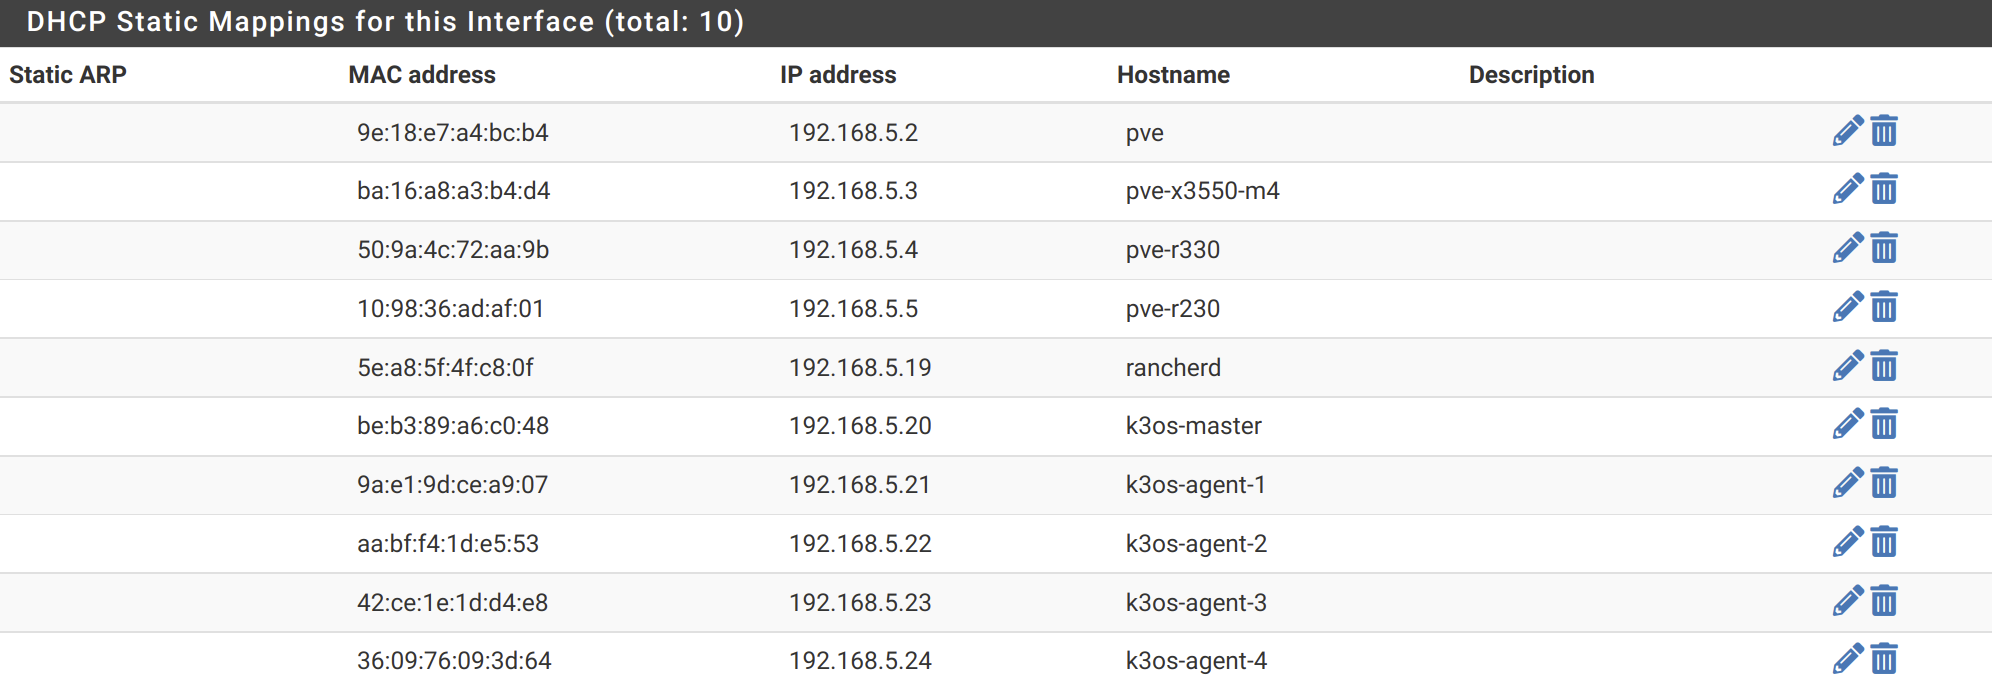
DHCP is configured in pfSense such that hostnames are registered to the DNS forwarder. This allows me to use DNS to access and reference all the internal hosts. For each network, I allow DHCP to assign from half of the set of IPs of the subnet mask. The other half of IPs of the subnet can be used for static IP mappings.
One pfSense package that is very nice to have is arpwatch. With this service, you can monitor your system for hosts communicating on your networks. It will detect new MAC addresses discovered through ARP messages and log the timestamp, hostname, MAC, and IP addresses of when that host was discovered. You can also have it email you if a new host is discovered.
For security on my Netgear MS510TXUP root router, I have DHCP Snooping enabled on the ports and VLANs. With this, I can make sure that only pfSense is handling DHCP requests. Any packets for other rouge DHCP services would be dropped.
The Netgear switch has a few other services which can be used to secure your networks. Such as port security and Dynamic ARP Inspection. This can be used to protect against MAC and IP address spoofing and ARP based attacks.
There are also a few services which can be enabled, such as Spanning Tree Protocol (it supports MSTP and RSTP) as well as IGMP snooping and Multicast VLAN Registration (MVR). These services can help optimize broadcast and multicast traffic forwarding through your internal networks.
Conclusion
I am becoming satisfied with the availability of new products supporting upwards of 10G. These products are becoming reasonably affordable for home users. Running pure 10G networks can be very expensive. Not only does cabling have to be upgraded, but the hardware and power required to run at 10G speeds can be prohibitive for most enthusiasts. These multi-gig (2.5G and 5G) solutions provide a nice in-between for getting past the gigabit wall we all have been experiencing for some time now.
I hope this post has been informative. I believe that it is very important to understand these networking fundamentals. Especially for professionals in the IT industry. Being able to troubleshoot networking issues and understand infrastructure is an awfully important skill to have. And that is reason alone to over engineer your own home networking :-) Happy learning!
Products
| Product | Link |
|---|---|
| NavePoint 9U network rack enclosure | https://ebay.us/8xdONP |
| Patch Panel 24 Port Cat6A with Inline Keystone | https://ebay.us/KIuCTe |
| Netgear 10-Port 10G / Multi-Gigabit (MS510TXUP) | https://ebay.us/oGuCSz |
| Lenovo ThinkCentre M920x Tiny | https://ebay.us/Zs9p3K |
| Synology DS1821+ 8 Bay NAS | https://ebay.us/QFcrFZ |
| CyberPower OR500LCDRM1U 500VA/300W UPS | https://ebay.us/hHVuS5 |
| AC Infinity S7-P Dual 120mm fans | https://ebay.us/e1kCw8 |
| SK hynix Gold P31 1TB PCIe NVMe SSD | https://ebay.us/MhJzvk |
| SuperMicro AOC-STGN-I2S Dual Port 10GB SFP+ NIC | https://ebay.us/K88gKO |
| 01AJ940 PCI-E x16 riser card | https://ebay.us/8FqsUd |
| Ubiquiti UniFi Switch 8-Port 150W (US-8-150W) | https://ebay.us/hmUTWM |
| Qotom Q355G4 | https://ebay.us/wfvSiE |
The following are the products used in this post.
When you click on links to various merchants on this site and make a purchase, this can result in this site earning a commission. Affiliate programs and affiliations include, but are not limited to, the eBay Partner Network.