Install Pi-hole on Arch
How to install Pi-hole on Arch linux. Pi-hole prevents advertisers from tracking you. We will go over tips and trips for the perfect Pi-hole installation.

Updated for Pi-hole v3.1.4
Pi-hole is a DNS caching and advertisement blocking application that runs on a local network. The benefits of using Pi-hole in addition to or replacing a browser extension, like Adblock Plus or uBlock Origin, are that any device on the network can benefit from the ad blocking without modification.
Currently, the Pi-hole blacklist has just over one hundred thousand entrees and will block Youtube ads, Google analytics tracking, and much more. The user can also specify their own custom blacklisted domains as well as whitelist any domains which exist in the default blacklists.
Pi-hole uses dnsmasq internally to process and filter DNS requests. Clients wishing to take advantage of the service need only add the IP address of the Pi-hole instance to their resolver list or make it global to the network by setting the DNS resolver in their DHCP settings on their router. Another benefit is that DNS requests will be cached so that future requests will be answered very fast and will not use any additional outgoing bandwidth.
In addition to the DNS filtering, Pi-hole has a secondary web application, called AdminLTE which can be used to monitor and administrate the blacklists remotely.
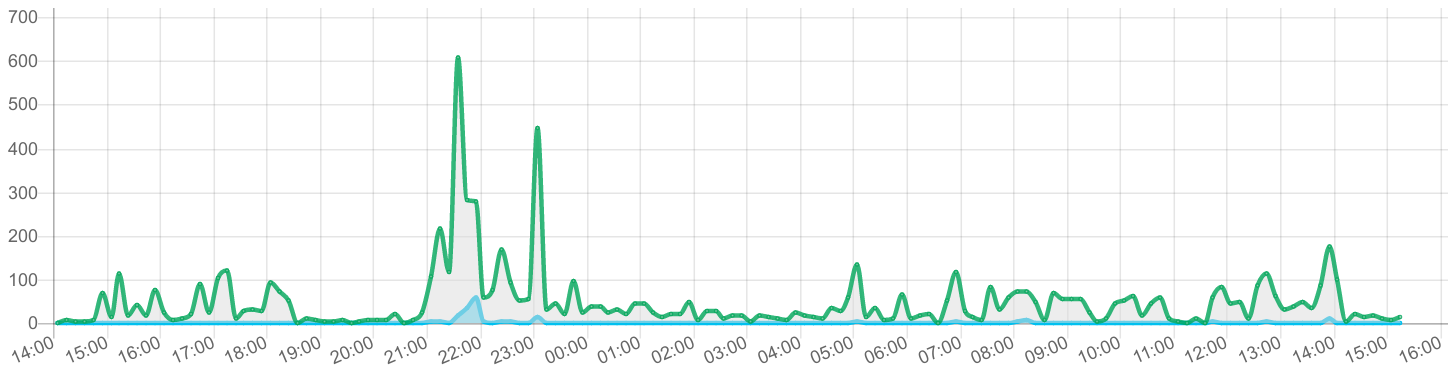
The Pi-hole FTL engine is another separate process used to aggregate statistics of DNS queries and is used as an API through the web-interface.
Hardware requirements are not high. Pi-hole can be installed on a Raspberry Pi. This method can be used to serve many clients and IOT devices.
For this post, we will use Nginx[1] to serve the content of the web interface. The official Pi-hole installation method assumes that the distribution being used is either Debian or Red-Hat based. I was able to install Pi-Hole on Arch Linux using the simple instructions below.
Installation
First, make sure that the Arch system is up to date. Also, install an AUR helper utility, such as pacaur, as the pi-hole-server package does not exist in the core repositories.
Install the following dependencies:
sudo pacman -S nginx-mainline php-fpm
pacaur -S pi-hole-server
At this point, the pihole utility command will be available as well as the following dnsmasq configuration file:
- /etc/dnsmasq.d/01-pihole.conf
Systemd services files:
- pi-hole-ftl.service
- pi-hole-gravity.service
- pi-hole-gravity.timer
- pi-hole-logtruncate.service
- pi-hole-logtruncate.timer
The gravity service is used to populate the blacklist while the logtruncate service is used to flush the Pi-hole query log periodically.
Finally, the web application PHP files can be found here:
- /srv/http/pihole
Security
Next, the default password of Pi-hole should be updated for extra security:
pihole -a -p <password>
This is a perfect time to familiarize yourself with the pihole command and its functions.
Usage: pihole [options]
Example: 'pihole -w -h'
Add '-h' after specific commands for more information on usage

Whitelist/Blacklist Options:
  -w, whitelist       Whitelist domain(s)
  -b, blacklist       Blacklist domain(s)
  -wild, wildcard     Blacklist domain(s), and all its subdomains
                        Add '-h' for more info on whitelist/blacklist usage

Debugging Options:
  -t, tail            View the live output of the Pi-hole log

Options:
  -a, admin           Admin Console options
                        Add '-h' for more info on admin console usage
  -c, chronometer     Calculates stats and displays to an LCD
                        Add '-h' for more info on chronometer usage
  -g, updateGravity   Update the list of ad-serving domains
  -h, --help, help    Show this help dialog
  -l, logging         Specify whether the Pi-hole log should be used
                        Add '-h' for more info on logging usage
  -q, query           Query the adlists for a specified domain
                        Add '-exact' AFTER a specified domain for exact match
  -v, version         Show installed versions of Pi-hole, Admin Console & FTL
                        Add '-h' for more info on version usage
  status              Display the running status of Pi-hole subsystems
  enable              Enable Pi-hole subsystems
  disable             Disable Pi-hole subsystems
                        Add '-h' for more info on disable usage
  restartdns          Restart Pi-hole subsystems
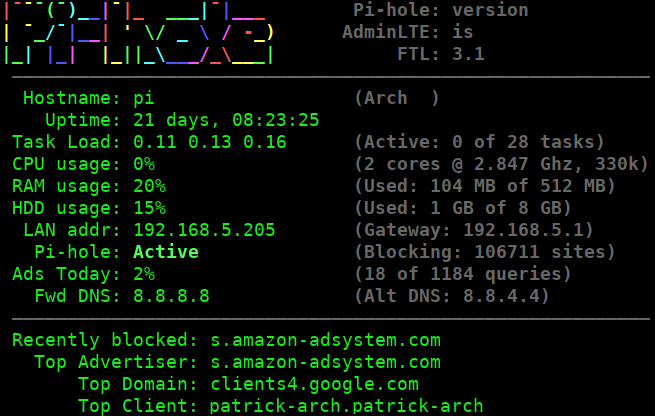
The chronometer is a convienent and great looking command to run to give a nice overview of the stats on the command line.
Configuration
We need to edit the Dnsmasq and Nginx configuration files to setup the DNS server as well as the routing to the web application.
Dnsmasq
Edit /etc/dnsmasq.conf and uncomment this line at the bottom of the file to take advantage of the Pi-hole filtering:
conf-dir=/etc/dnsmasq.d/,*.conf
PHP and Nginx
For the web application, we need to have Nginx pass HTTP requests to the php-fpm workers.
Enable the sockets extension in /etc/php/php.ini by uncommenting the following line:
extension=sockets.so
Edit /etc/nginx/nginx.conf to use a similar configuration as bellow:
user http;
worker_processes  auto;

error_log  /var/log/nginx/error.log;
error_log  /var/log/nginx/error.log  notice;
error_log  /var/log/nginx/error.log  info;

events {
    worker_connections  1024;
}

http {
    include       mime.types;
    default_type  application/octet-stream;

    log_format  main  '$remote_addr - $remote_user [$time_local] "$request" '
                      '$status $body_bytes_sent "$http_referer" '
                      '"$http_user_agent" "$http_x_forwarded_for"';

    access_log  /var/log/nginx/access.log  main;

    sendfile        on;

    keepalive_timeout  65;

    gzip            on;
    gzip_min_length 1000;
    gzip_proxied    expired no-cache no-store private auth;
    gzip_types      text/plain application/xml application/json application/javascript application/octet-stream text/css;

    include /etc/nginx/conf.d/*.conf;
}
Here is the contents of /etc/nginx/conf.d/pi_hole.conf which holds the nginx configuration for forwarding requests to the php application:
server {
    listen 80 default_server;
    listen [::]:80 default_server;
    server_name _;

    root /srv/http/pihole/pihole;
    index index.php;

    location / {
        try_files $uri $uri/ /index.php;
    }

    location ~ /\. {
        deny  all;
    }

    location ~ \.php$ {
        fastcgi_pass unix:/run/php-fpm/php-fpm.sock;
        fastcgi_index index.php;
        include       fastcgi.conf;
    }
}

server {
    listen 80;
    listen [::]:80;
    server_name pi.hole;

    root /srv/http/pihole/admin;
    index index.php;

    location / {
        try_files $uri $uri/ /index.php;
    }

    location ~ /\. {
        deny  all;
    }

    location /admin/ {
        return 302 /;
    }

    location ~ \.php$ {
        fastcgi_pass unix:/run/php-fpm/php-fpm.sock;
        fastcgi_index index.php;
        include       fastcgi.conf;
    }

    location ~* \.(js|css|png|jpg|jpeg|gif|ico|svg)$ {
        try_files     $uri /index.php;
        expires       24h;
        log_not_found off;
    }
}
We define two server blocks above. The default server block is used for additional tracking of blocked requests. When a user attempts to navigate to a blocked domain, they will see a webpage similar to this:
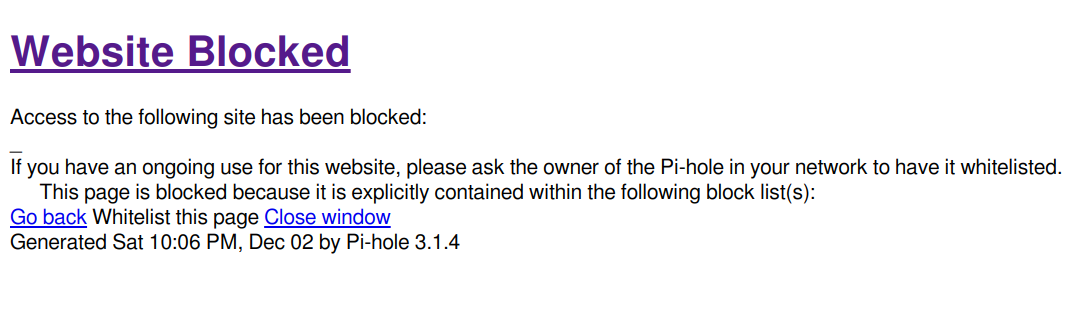
The final server block defines the pi.hole domain which is used to login to the admin interface. In the default Pi-hole configuration, in order to get to the admin interface, the url would be: http://pi.hole/admin. With this configuration, all that is needed to access this same page is: http://pi.hole. This page will not be available until after the system is set to use Pi-hole as the DNS resolver.
(Optional) SSL and HTTP2 Support
A SSL certificate can be used for encrypting traffic to and from the admin interface. With SSL enabled in Nginx, we can enable HTTP2 which offers great benefits in terms of performance.
We can generate a self-signed certificate to use for accessing the admin interface.
openssl req -x509 -sha256 -nodes -days 3650 -newkey rsa:4096 -keyout pi-hole.key -out pi-hole.crt
sudo mkdir -p /etc/nginx/ssl
sudo mv pi-hole.{crt,key} /etc/nginx/ssl/
One caveat is that when accessing the site through HTTPS, a browser warning will show unless an exception to the domain is added. It would be preferrable to use a SAN certificate from a trusted certificate authority and a validated domain name. If that is something that you can aquire, skip the above step.
We then modify /etc/nginx/conf.d/pi_hole.conf and add the following server blocks at the bottom of the file:
server {
    listen 443 ssl http2;
    listen [::]:443 ssl http2;
    server_name pi.hole;

    ssl on;
    ssl_certificate /etc/nginx/ssl/pi-hole.crt;
    ssl_certificate_key /etc/nginx/ssl/pi-hole.key;

    root /srv/http/pihole/admin;
    index index.php;

    location / {
        try_files $uri $uri/ /index.php;
    }

    location /admin/ {
        return 302 /;
    }

    location ~ /\. {
        deny  all;
    }

    location ~ \.php$ {
        fastcgi_pass unix:/run/php-fpm/php-fpm.sock;
        fastcgi_index index.php;
        include       fastcgi.conf;
    }

    location ~* \.(js|css|png|jpg|jpeg|gif|ico|svg)$ {
        try_files     $uri /index.php;
        expires       24h;
        log_not_found off;
    }
}
server {
    listen 443 ssl default_server;
    listen [::]:443 ssl default_server;
    server_name _;

    ssl on;
    ssl_certificate /etc/nginx/ssl/pi-hole.crt;
    ssl_certificate_key /etc/nginx/ssl/pi-hole.key;

    root /srv/http/pihole/pihole;
    index index.php;

    location / {
        try_files $uri $uri/ /index.php;
    }

    location ~ /\. {
        deny  all;
    }

    location ~ \.php$ {
        fastcgi_pass unix:/run/php-fpm/php-fpm.sock;
        fastcgi_index index.php;
        include       fastcgi.conf;
    }
}
Start and Enable the Services
Now all that is left to do is enable the supplied Systemd services:
sudo systemctl start pi-hole-ftl dnsmasq php-fpm nginx
sudo systemctl enable pi-hole-ftl dnsmasq php-fpm nginx
Make sure that each service has started correctly:
sudo systemctl status pi-hole-ftl dnsmasq php-fpm nginx
Testing
To test to see if the DNS resolver is working properly, you can use dig (which can be found in the dnsutils package):
dig @<pi-hole-ip> google.com
This command uses the Pi-hole DNS server as the resolver to query for google.com. This should succeed with a public IP address in the answer section of the output. If you run the command again, you will notice the query time is much faster. That is because the DNS record is cached.
To check to see if the blocklist is working properly, run the following command:
dig @<pi-hole-ip> s.amazon-adsystem.com
In the answer section of the output, you will notice that the Pi-hole IP address is returned which means that the domain has been blocked.
Conclusion
You can now configure your clients to use the Pi-hole DNS resolver. Once complete, navigate to http://pi.hole or https://pi.hole to view the web-interface.
Congratulations on the successful installation of Pi-hole. I hope you have learned a thing or two about how DNS resolvers work as it is a fundamental concept of the World Wide Web.
For even more fun, check out the following for additional Pi-hole related learning:
- DNSCrypt on Pi-hole
- OpenVPN server: Only route DNS via VPN
- Adding easylist and other AdBlock-like sources to PiHole!
- Pyholecli
The Pi-hole server package comes with a lighttpd configuration which can also be used to run the web-application. ↩︎