Automate Your Garage With Smart IOT Devices
A garage is a perfect place to get started with installing IOT devices for home automation.

In this post, we will take a look at some easy to install devices, such as the Shelly 1. The device can be used to engage a typical garage door opener, sense whether the door is open or closed, and react to events within our garage. We will use the Home Assistant open source software to manage the devices and create a few automations we need to make our garage truly smart!
Making a Garage Door Opener Smart with Shelly 1
The Shelly 1 is a small yet very capable WI-FI operated relay switch. With this device, we can remotely trigger our garage door opener to open or close the door. In addition, we can wire in a contact switch in order to remotely detect the positioning of the door.
Powering the Shelly 1
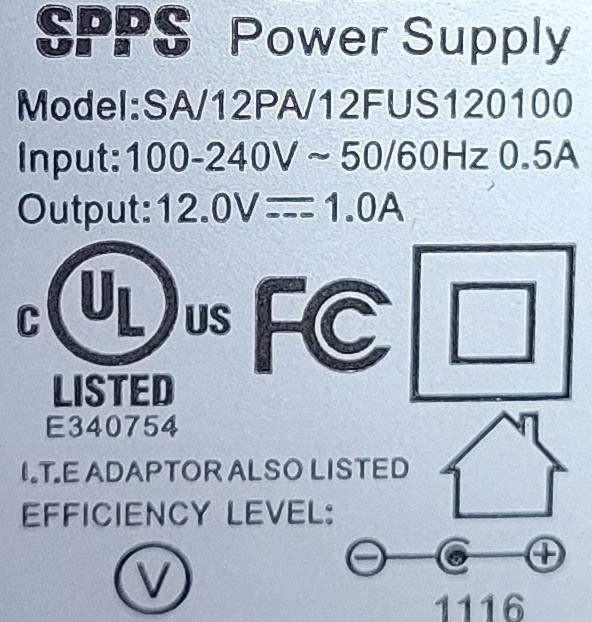
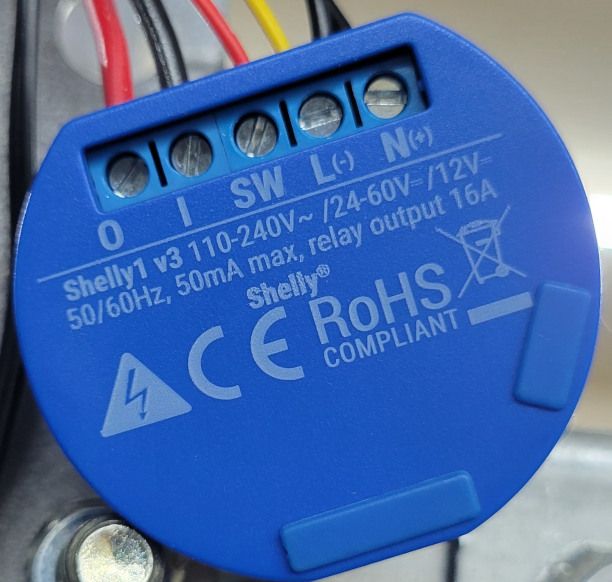
The Shelly 1 is capable of being powered by a 12V or 24-60V DC power supply. You should choose a power supply that is within the maximum voltage capabilities of your contact switch. In my case, my contact switch supports up to 28V DC. I had an unused 12VDC power supply lying around, so I repurposed it to power my Shelly 1 and contact switch.
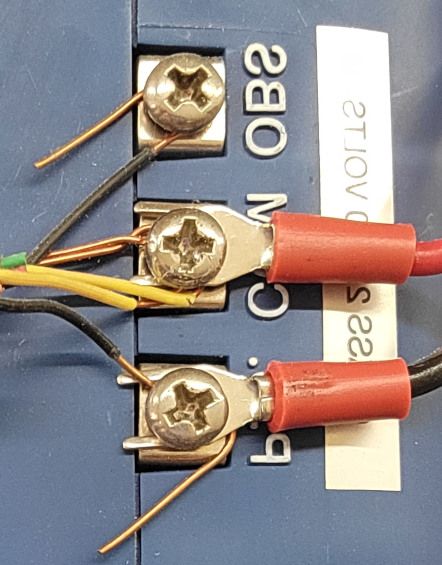
The positive wire from the DC power supply should go to the N+ terminal, while the negative wire goes into L-. Before turning on the device, make sure to set the jumper properly on the internal Shelly 1 contacts, which are under the removable cover. The Shelly 1 that I received was pre-configured for AC and not DC.
See the official wiring diagram for more details on how to wire the device.
Configuring the Shelly 1
When powering on the Shelly 1 for the first time, the devices creates a WI-FI access point to connect to. You should see the WI-FI network as "shelly1-XXX". Connect to this access point using a laptop or mobile device, and navigate to 192.168.33.1 to access the web UI to configure the device.
First, go to Internet & Security and will out the options under WI-FI Mode Client to connect to your homes WI-FI network.
Under Timers, we want to configure the Auto Off setting. Set a value of 0.5 seconds. What this will do is when we have fully wired the device and it is remotely activated, the internal relay will close the circuit to the garage door opener. This triggers the opener to open or close. The Shelly 1 will automatically open the circuit after half a second, which will prevent the opener from continuously opening and closing the door.
Under Settings, set the Power On Default Mode to Off. And for Button Type, select Detached Switch. This will prevent changes to the state of the garage door sensor from triggering our garage door opener.
You may consider checking the Reverse inputs option as well. If your switch is the NC (Normally Closed) contact type, the Shelly 1 firmware will consider the switch "open" when the door is closed. Reversing the inputs will display "closed" in this case.
For more information, see the Shelly 1 web interface guide.
Connecting the Shelly 1 to the Garage Door Opener
Connecting the Shelly 1 to the garage door opener is very simple. On the side of the opener, there are usually several terminals. Refer to your manual on exactly how these terminals are used to initiate opening and closing of the garage door. This is the description in my manual for manually testing the opener:
Connect the opener to a power source and short across the screw terminals labeled "PB" and "COM"...
So, I connect the COM terminal on the garage door opener to the I terminal on the Shelly 1 (the I terminal represents the input load) and connect the PB terminal to the O terminal (which represents the output load).
Once connected, you should be able to go into the Shelly 1 web interface and trigger the door to open and close!
Determining the Position of the Garage Door
In order to determine whether the garage door is open or closed, we wire in a magnetic contact switch. This is also known as a reed switch and uses a detached magnet. For NC contact switches, when the magnet is near, the circuit will close allowing current to flow. When the magnet is moved away, the switch will open and the current will not flow. The Shelly 1 can detect the flow of current through the switch to determine the positioning of the door.
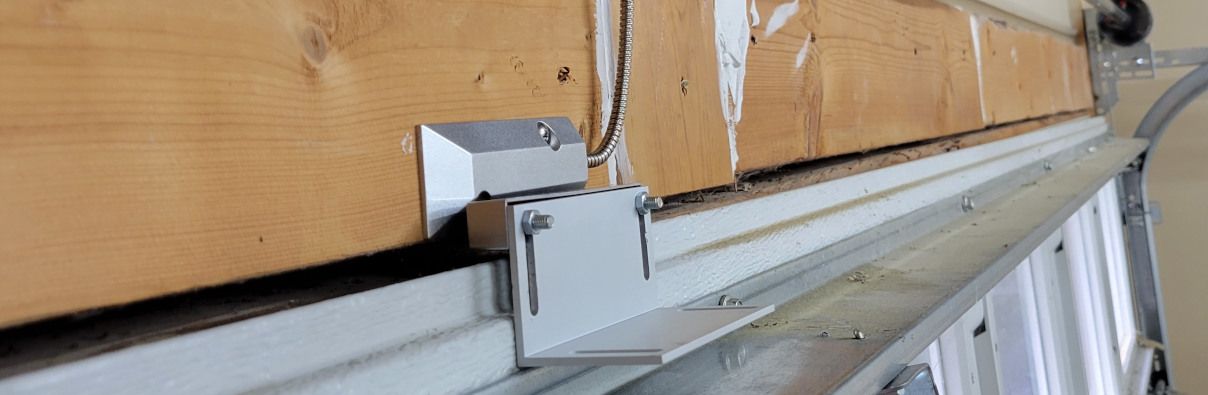
I found a convenient spot above my garage door, where I was able to screw in the wired switch. Then, I mounted the magnet portion on to the door itself in close proximity to the switch.
When the door is closed, the magnet is near and the circuit is complete. When the door is opened, the magnet moves away from the switch and the circuit is opened. We can not know how much the door is open. But this will give us a good indication whether the door is closed or not. In my testing, since the door opens both up and away from the wall, the magnet moves away from the switch rather quickly.

I ran the wires to the switch along the outside of the metal frame for the chain. My Shelly 1 is placed right above the door opener.
Wire in the switch to the SW terminal of the Shelly 1. And place the other wire for the switch into the L- terminal.

We will be able to tell whether the switch is working properly by going into the Shelly web interface. When the door is open, the middle of the button illuminates blue. Otherwise, this portion will be white.
Integration with Home Assistant
At this point, we have a pretty functional way of opening and closing the garage door as well as seeing whether the door is closed or not. We can go further by using the Shelly integration for Home Assistant.
After configuring the integration, we will have access to two entities in Home Assistant. One switch, named "switch.shelly1_XXX", will allow us to engage the garage door opener to open or close. The other binary sensor, "binary_sensor.shelly1_XXX", will allow us to sense the positioning of the door.
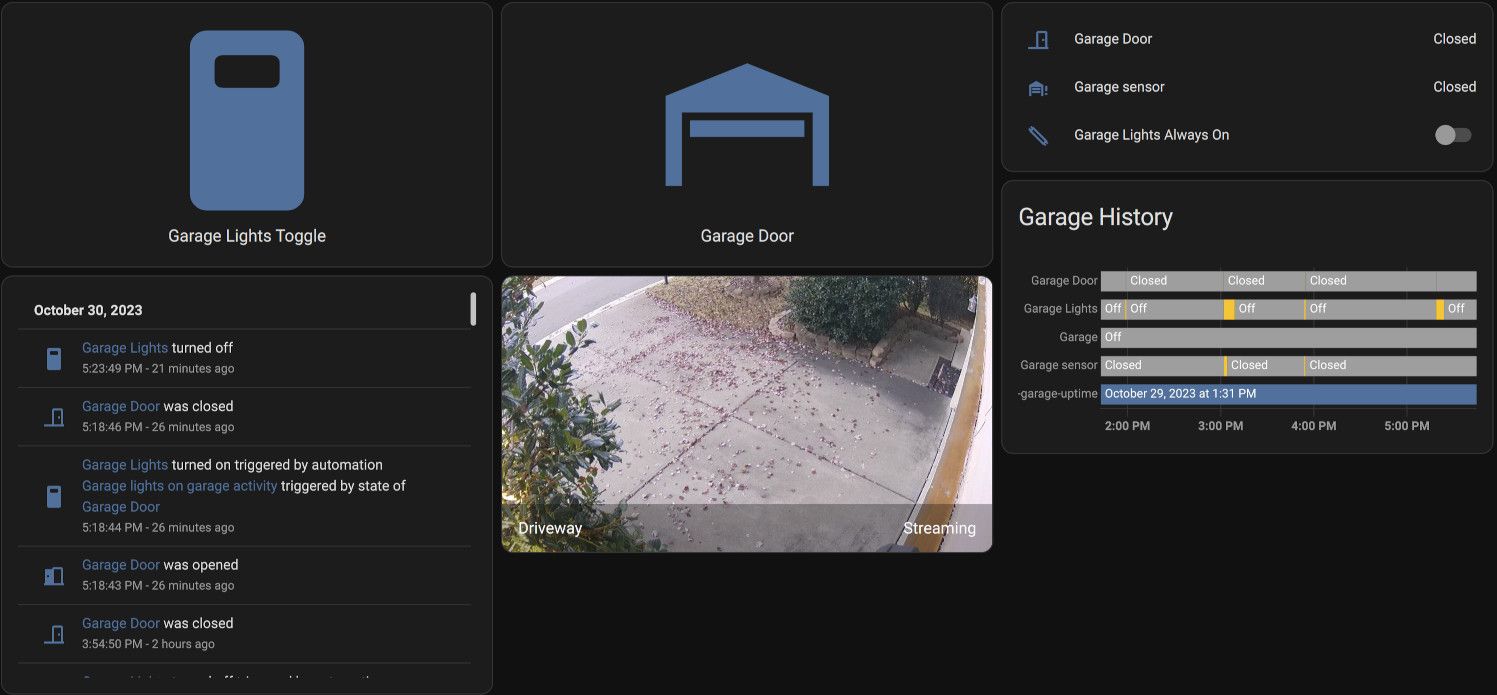
At this point, we can create a nice dashboard with our entities. The above is an example that I have configured in Home Assistant.
Alert! Garage Door is Open!
Have you ever come home to realize that you left your garage door open while you were away? Luckily, we are now able to use Home Assistant to alert us when the door has been left opened for a certain period of time.
Before we do this, we need to edit our Home Assistant, configuration.yaml to specify a notify integration. There are many different options for sending notifications. I choose to use SMTP, since I can send an email as well as a text message to my AT&T number using this method.
Here is an example for using Gmail. You may create an App Password to use with the configuration below.
notify:
  - name: email_notification
    platform: smtp
    server: smtp.gmail.com
    port: 587
    timeout: 15
    sender: <replace>@gmail.com
    sender_name: "Home Assistant"
    recipient: <replace>@gmail.com
    starttls: true
    username: <replace>@gmail.com
    password: <replace>
Go to the Settings -> Automations and create a new automation. You can switch to Edit in YAML in order to copy the following (replacing the entity_id with your corresponding Shelly 1 entity):
alias: Garage open notification
trigger:
  - platform: state
    entity_id:
      - binary_sensor.shelly1_XXX_input
    from: "off"
    to: "on"
    for:
      hours: 0
      minutes: 10
      seconds: 0
action:
  - service: notify.email_notification
    data:
      message: Garage door is open!
      title: Garage door is open!
      target: 111111111@mms.att.net
  - service: notify.email_notification
    data:
      message: Garage door is open!
      title: Garage door is open!
      target: some-email@example.com
This will send an email and a text message after the garage door has been opened for more than 10 minutes.
Many mobile networks will allow emailing to a cell phone number through a specific carrier address. For example, AT&T will allow sending an email as a text message using the address structure, <att-number>@mms.att.net.
If you receive this message, a good idea would be to have your smart phone configured so that you may remotely connect into your network. In order to access your Home Assistant remotely. Take a look at the following post for instructions on how to set that up with pfSense.
 Patrick Jennings
Turning On Lights When the Garage is Opened

I use a Kasa motion sensor light switch in my garage to activate and control my overhead LED lights. This light switch is also connected to Home Assistant. It activates well when motion is sensed in the garage, but it is much nicer to have the lights turn on as soon as the garage is opened instead of waiting for detected motion.
We can do this easily enough with the following Home Assistant automation.
alias: Garage Lights on when Garage opened
trigger:
  - platform: state
    entity_id:
      - binary_sensor.shelly1_XXX_input
    from: "off"
    to: "on"
action:
  - entity_id: switch.garage_lights
    service: switch.turn_on
NFC Tags for Opening the Garage
Home Assistant can program NFC Tags, which can then be scanned and used for automations. We can use this to place a tag outside, which can then be scanned by a smartphone and trigger the garage door opener.
In Home Assistant, go to Settings -> Tags. Create a new Tag. This will create a unique tag ID that only our Home Assistant installation will have any association with. What is being written to the NFC tag, will be a URL in the form of https://www.home-assistant.io/tag/<tag id>. Only a device authenticated and connected to our Home Assistant can trigger this automation.
We can associate this tag with a new automation. That will trigger the garage door to open or close when the tag is scanned:
alias: Open Garage when Garage Door Tag is scanned
trigger:
  - platform: tag
    tag_id: <tag-id>
action:
  - service: switch.toggle
    target:
      entity_id: switch.shelly1_XXX
With a mobile phone supporting NFC capabilities and using an official Home Assistant companion app, we can write this tag to a programmable NFC tag.
As a side note, if you will be adhering this tag to a surface, you should first test that the tag scans properly beforehand against that surface. I have found that the tags will not scan as well, or even at all, when placed near metal objects, which may be near or behind the wall or surface the tags are placed on.
And that is it! Scanning the NFC tag will trigger the door to open or close.
Conclusion
With a few connected IOT devices, a little bit of wiring, and some software configuration, we are able to make our garage smart and connected. This will enhance the safety of our home in addition to making it more convenient to operate. Finally, none of these devices require a connection outside of our home network or to external services, so we are preserving our privacy as well.
Products
If you are interested in the products that I used, here are some affiliated links to checkout.
| Product | Link |
|---|---|
| Shelly 1 Relay Switch | https://amzn.to/411D1c0 |
| Heavy Duty Wired Garage Door Magnetic Contact Switch | https://amzn.to/40lB1eh |
| Kasa Smart Motion Sensor Switch | https://amzn.to/3QkIuG3 |
| Timeskey NFC Tags 20PCS NTAG 215 NFC Stickers | https://amzn.to/3tSavwZ |
|
Here are some useful tools and products to help with wiring. |
|
| Product | Link |
| 22AWG UL2464 Power Cable | https://amzn.to/3QoVNoU |
| haisstronica 6PCS Crimping Tool Set | https://amzn.to/3FF7XVA |
| TICONN 250Pcs Heat Shrink Wire Connectors | https://amzn.to/3skprDF |
| Kuject 120PCS Solder Seal Wire Connectors | https://amzn.to/45WXBLi |
| 60 PCS Adhesive Cable Clips | https://amzn.to/3QIpv9u |